Jekyll2026-05-17T21:17:31+07:00https://www.varokas.com/feed.xmlMinimal EngineeringSetting up local Spark Cluster2024-12-02T06:03:54+07:002024-12-02T06:03:54+07:00https://www.varokas.com/local-sparkEMR presents a convenient method for rapidly deploying a cluster. However, we frequently require an ability to explore locally stored data rapidly. This guide walktlhoughts setting up a minimal local spark cluster fit for stated purpose.
$ curl -s "https://get.sdkman.io" | bash

$ sdk install java 17.0.13-zulu
$ sdk install spark 3.5.3

# Uses (sdk list java) OR (sdk list sparks) to see all available version
Install UV
# On macOS and Linux.
curl -LsSf https://astral.sh/uv/install.sh | sh
Jupyter Notebook
Using uv to setup the project and add libraries
$ uv init
$ uv add pyspark jupyterlab
Then we can run bringup the notebook using this command
$ uv run jupyter lab
Minimally we can connect to by creating Sparksession using
from pyspark.sql import SparkSession

spark = SparkSession.builder \
      .master("local[*]") \
      .appName("spark-demo") \
      .config(map={
         ## Configuration goes here
      }) \
      .getOrCreate()
Starting spark this way would create a WebUI at 4040. we can inspect this address by evaluating
spark.sparkContext.uiWebUrl
Local Iceberg Table
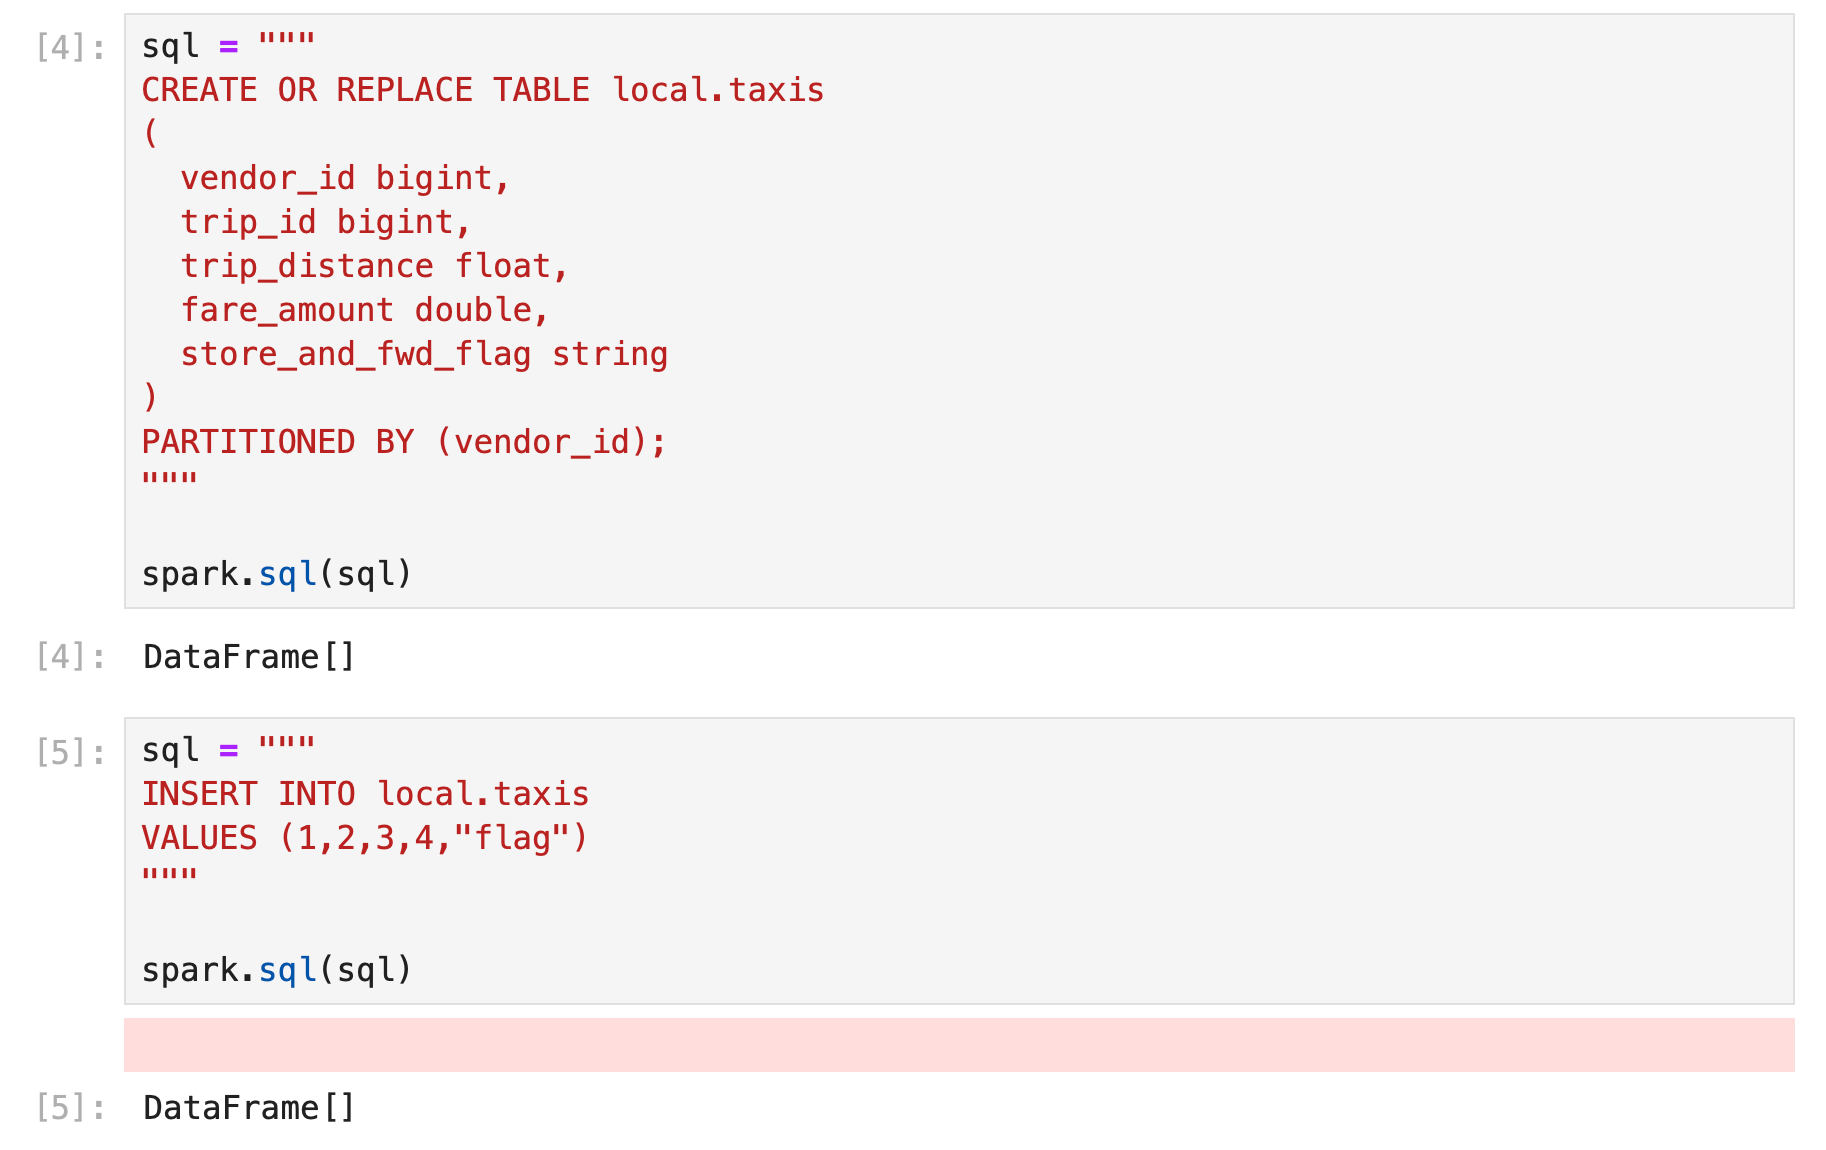
For a short experimentation with Local Iceberg table, we can configure sparks to store metadata in a local file. The example below shows how we could setup a catalog named local , where the data files are stored at $PWD/warehouse
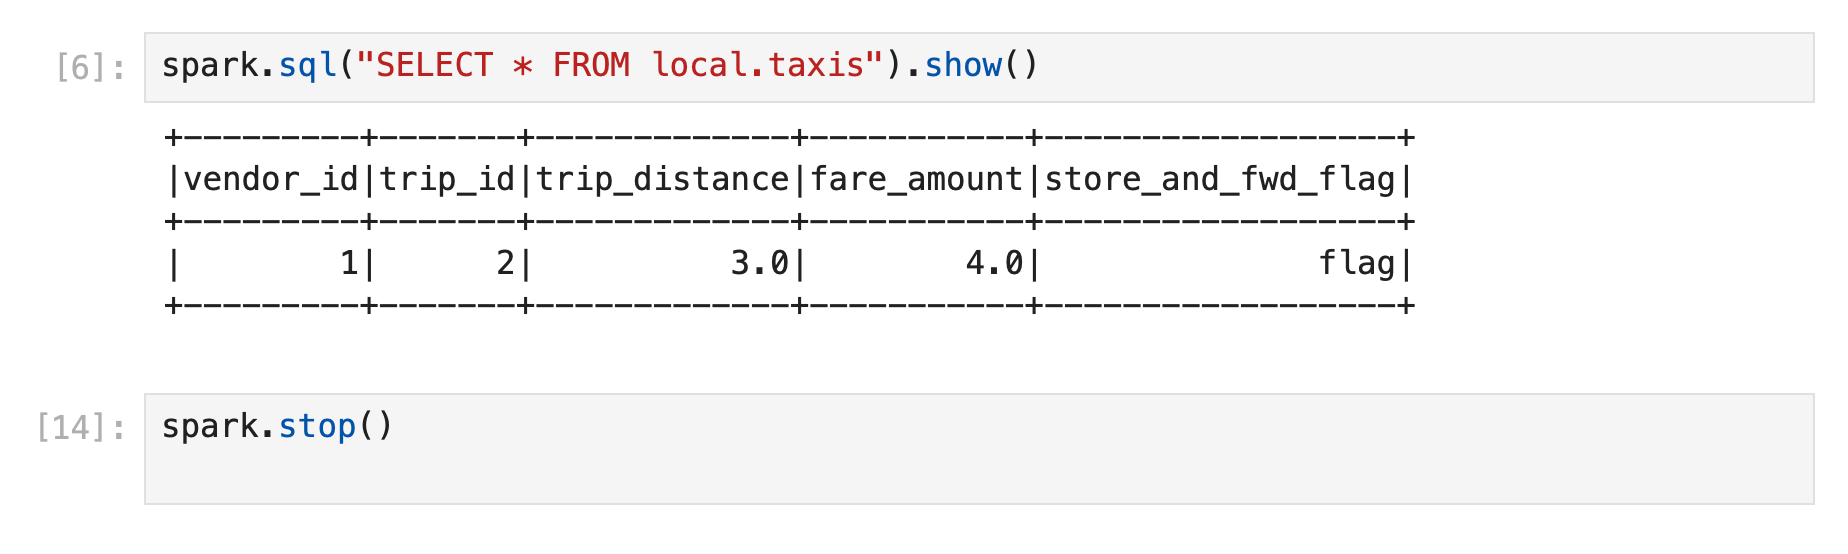
after setting up spark session, we can create and use the iceberg tables from pyspark.
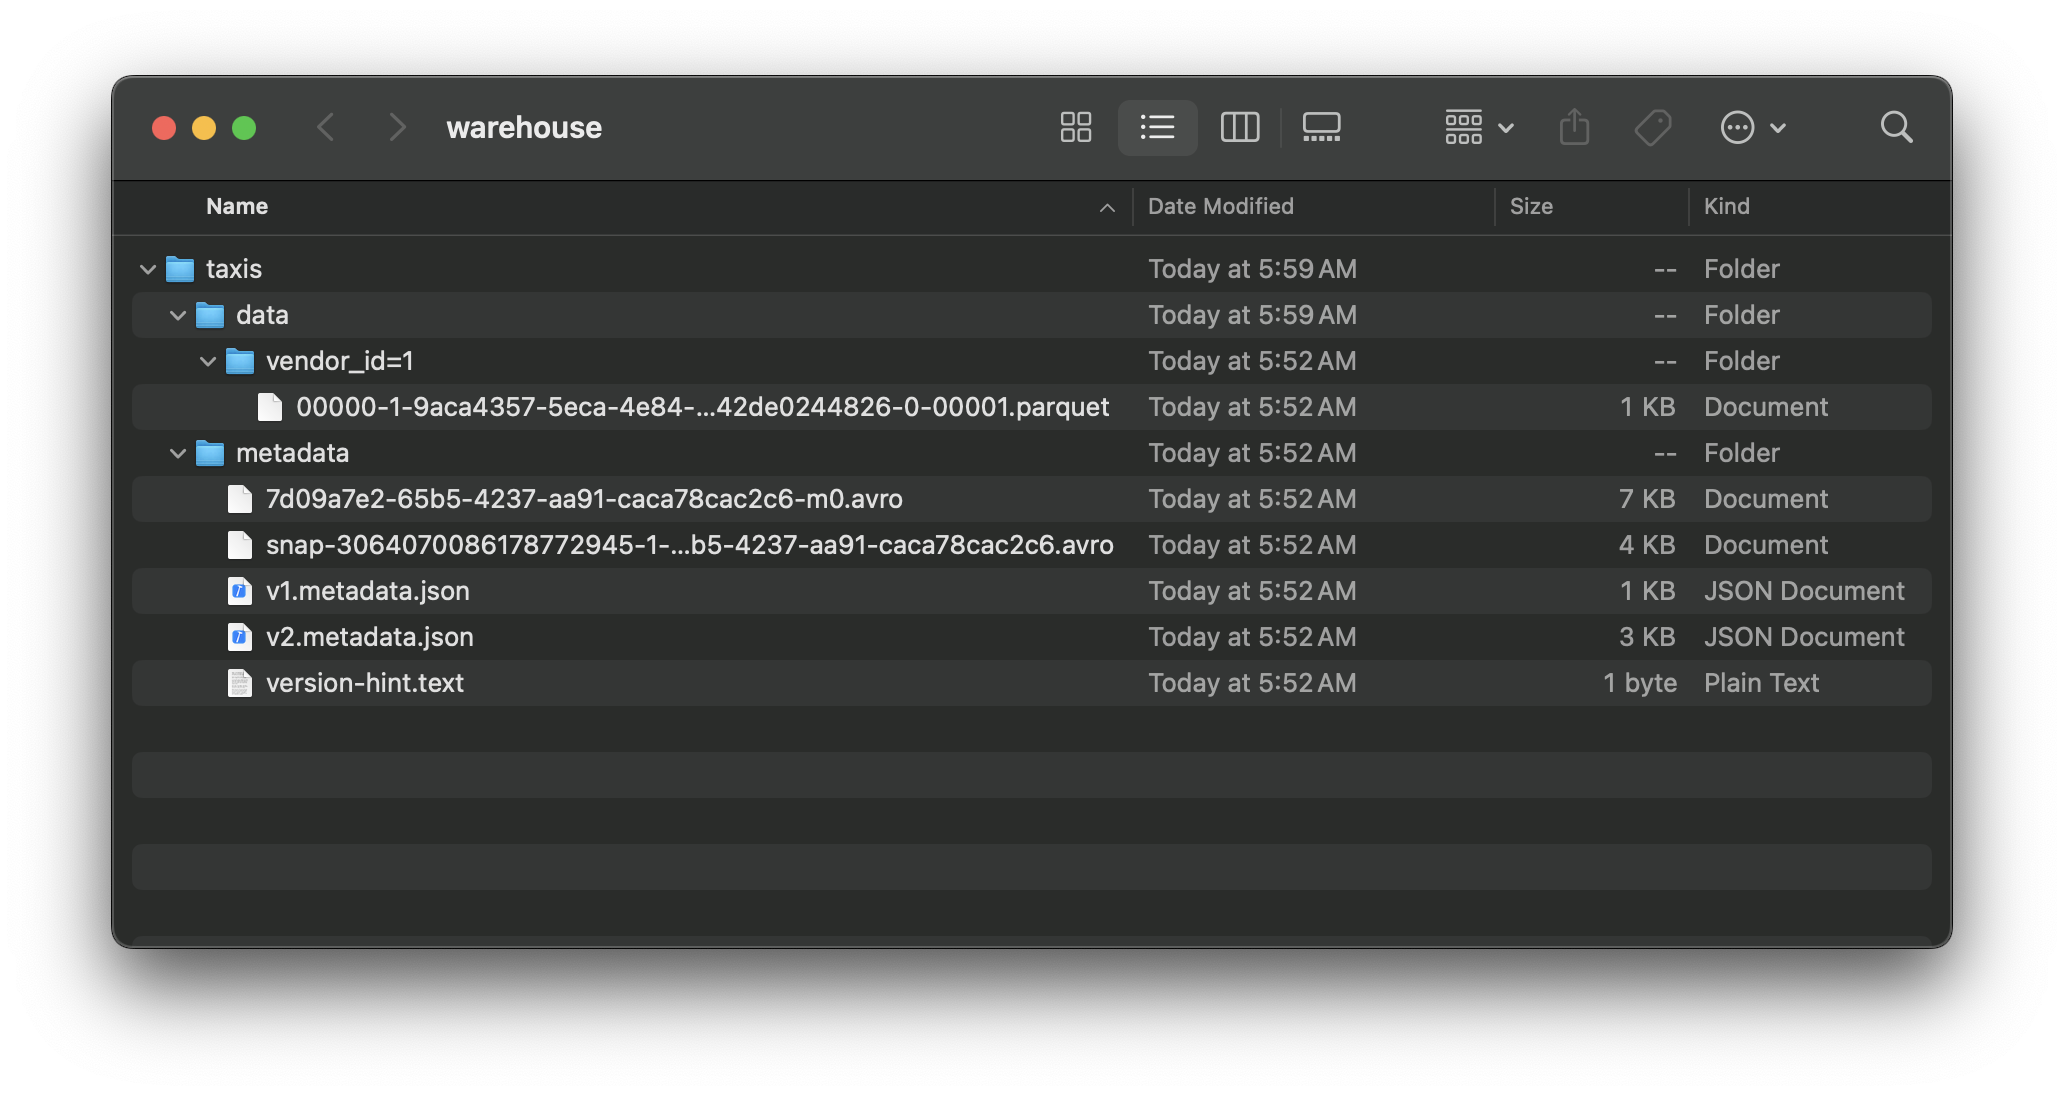
Data will be written to designated directory
]]>Varokas PanusuwanUV - Poetry Replacement2024-08-24T07:08:19+07:002024-08-24T07:08:19+07:00https://www.varokas.com/uvUV is an extremely fast dependencies and project manager. It has roughly equivalent in functionality with Poetry, but is much faster.
Installing
$ curl -LsSf https://astral.sh/uv/install.sh | sh
New Project
Uses uv init to initialize a project with pyproject.toml configuration file. Use uv add to add new dependencies.
Using uv run is similar to poetry run, where the code is executed from within the project
uv run app.py
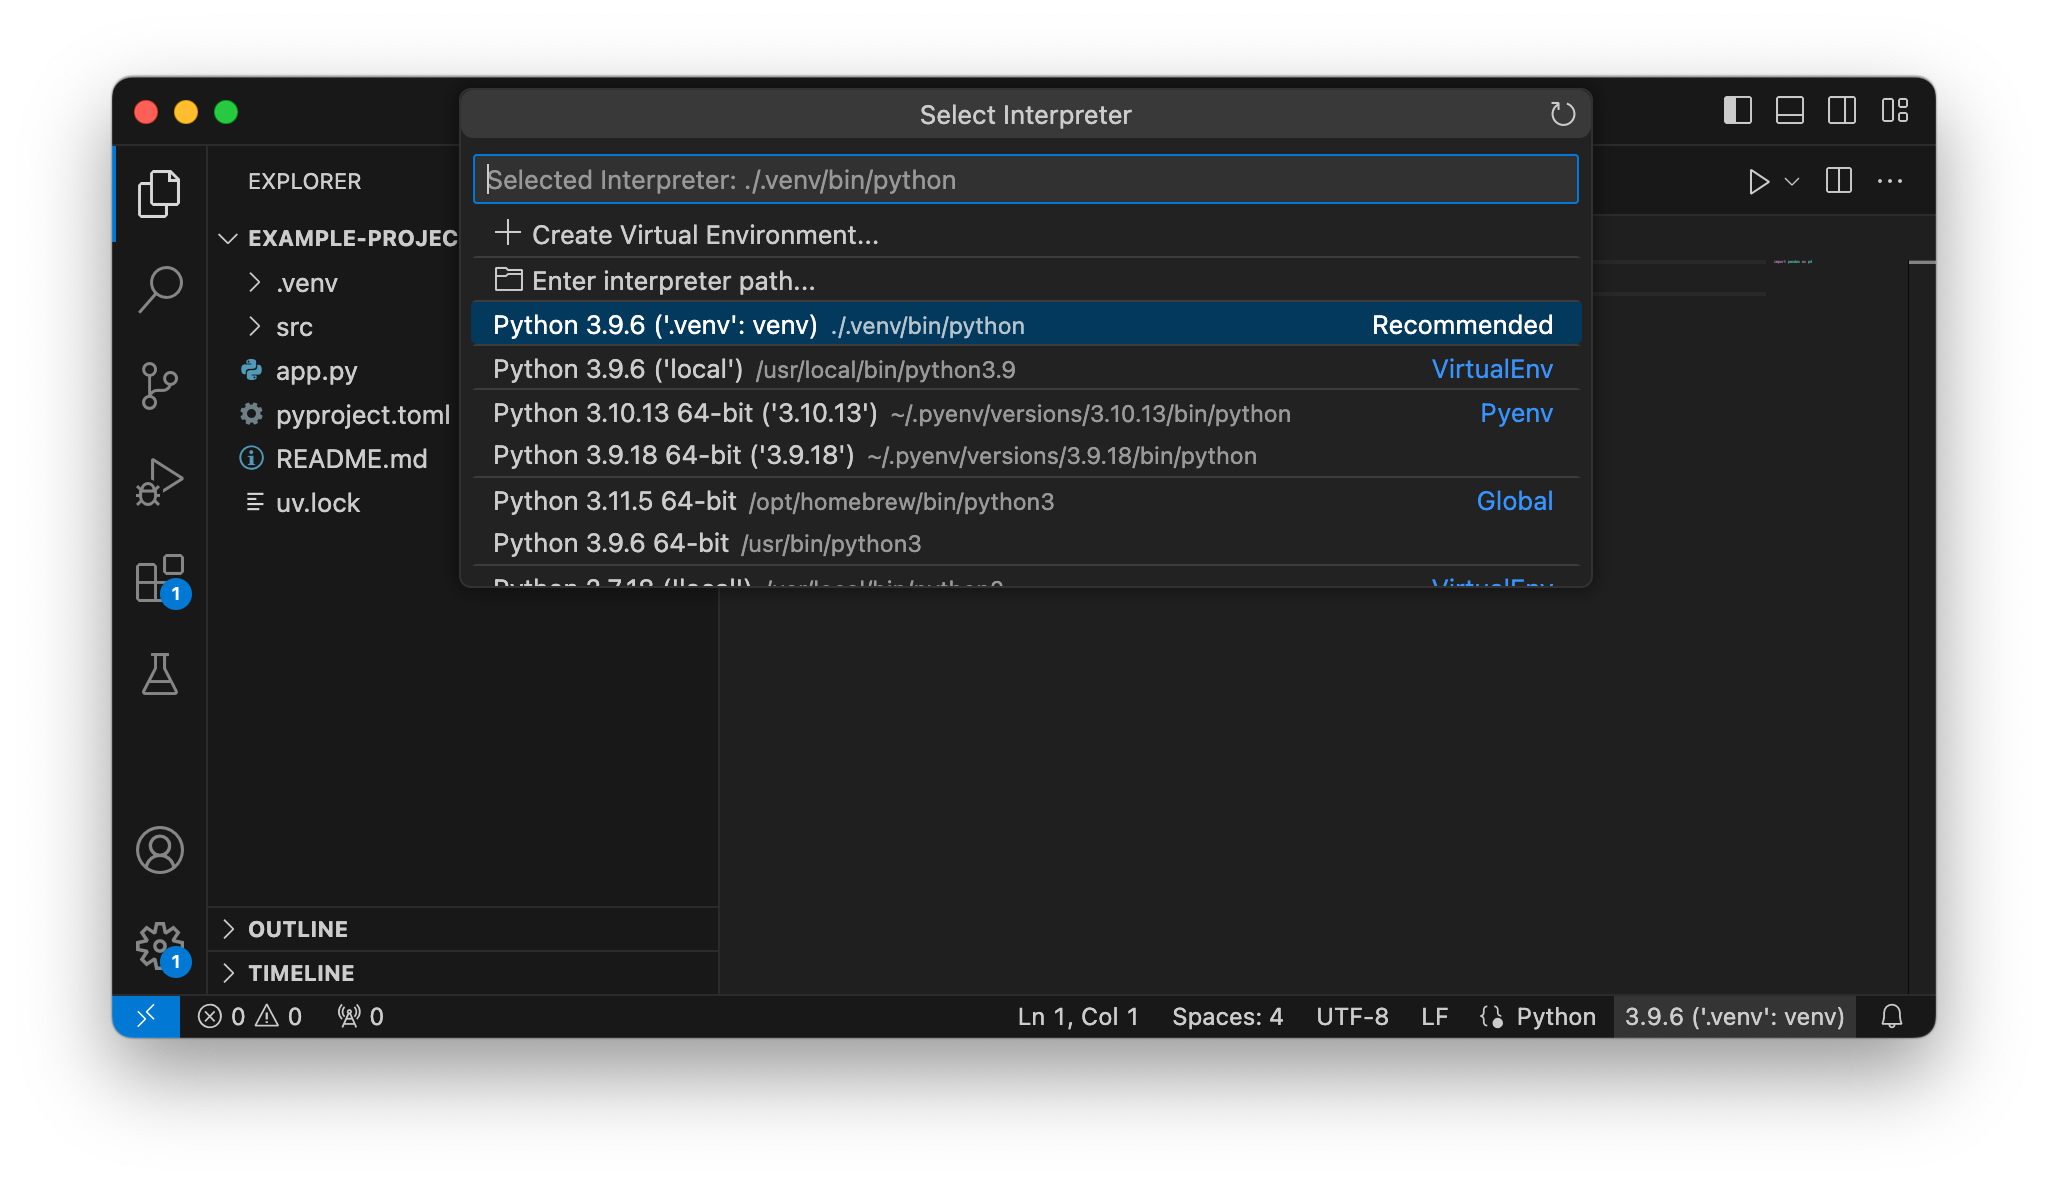
Visual studio Code Integration
VSCode should automatically picks up the environment in .venv . If not, uses the environment selector on the bottom right corner to do so.
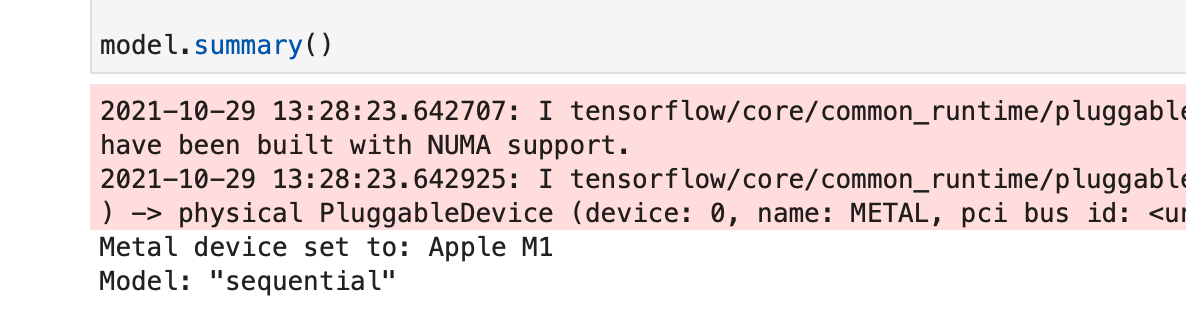
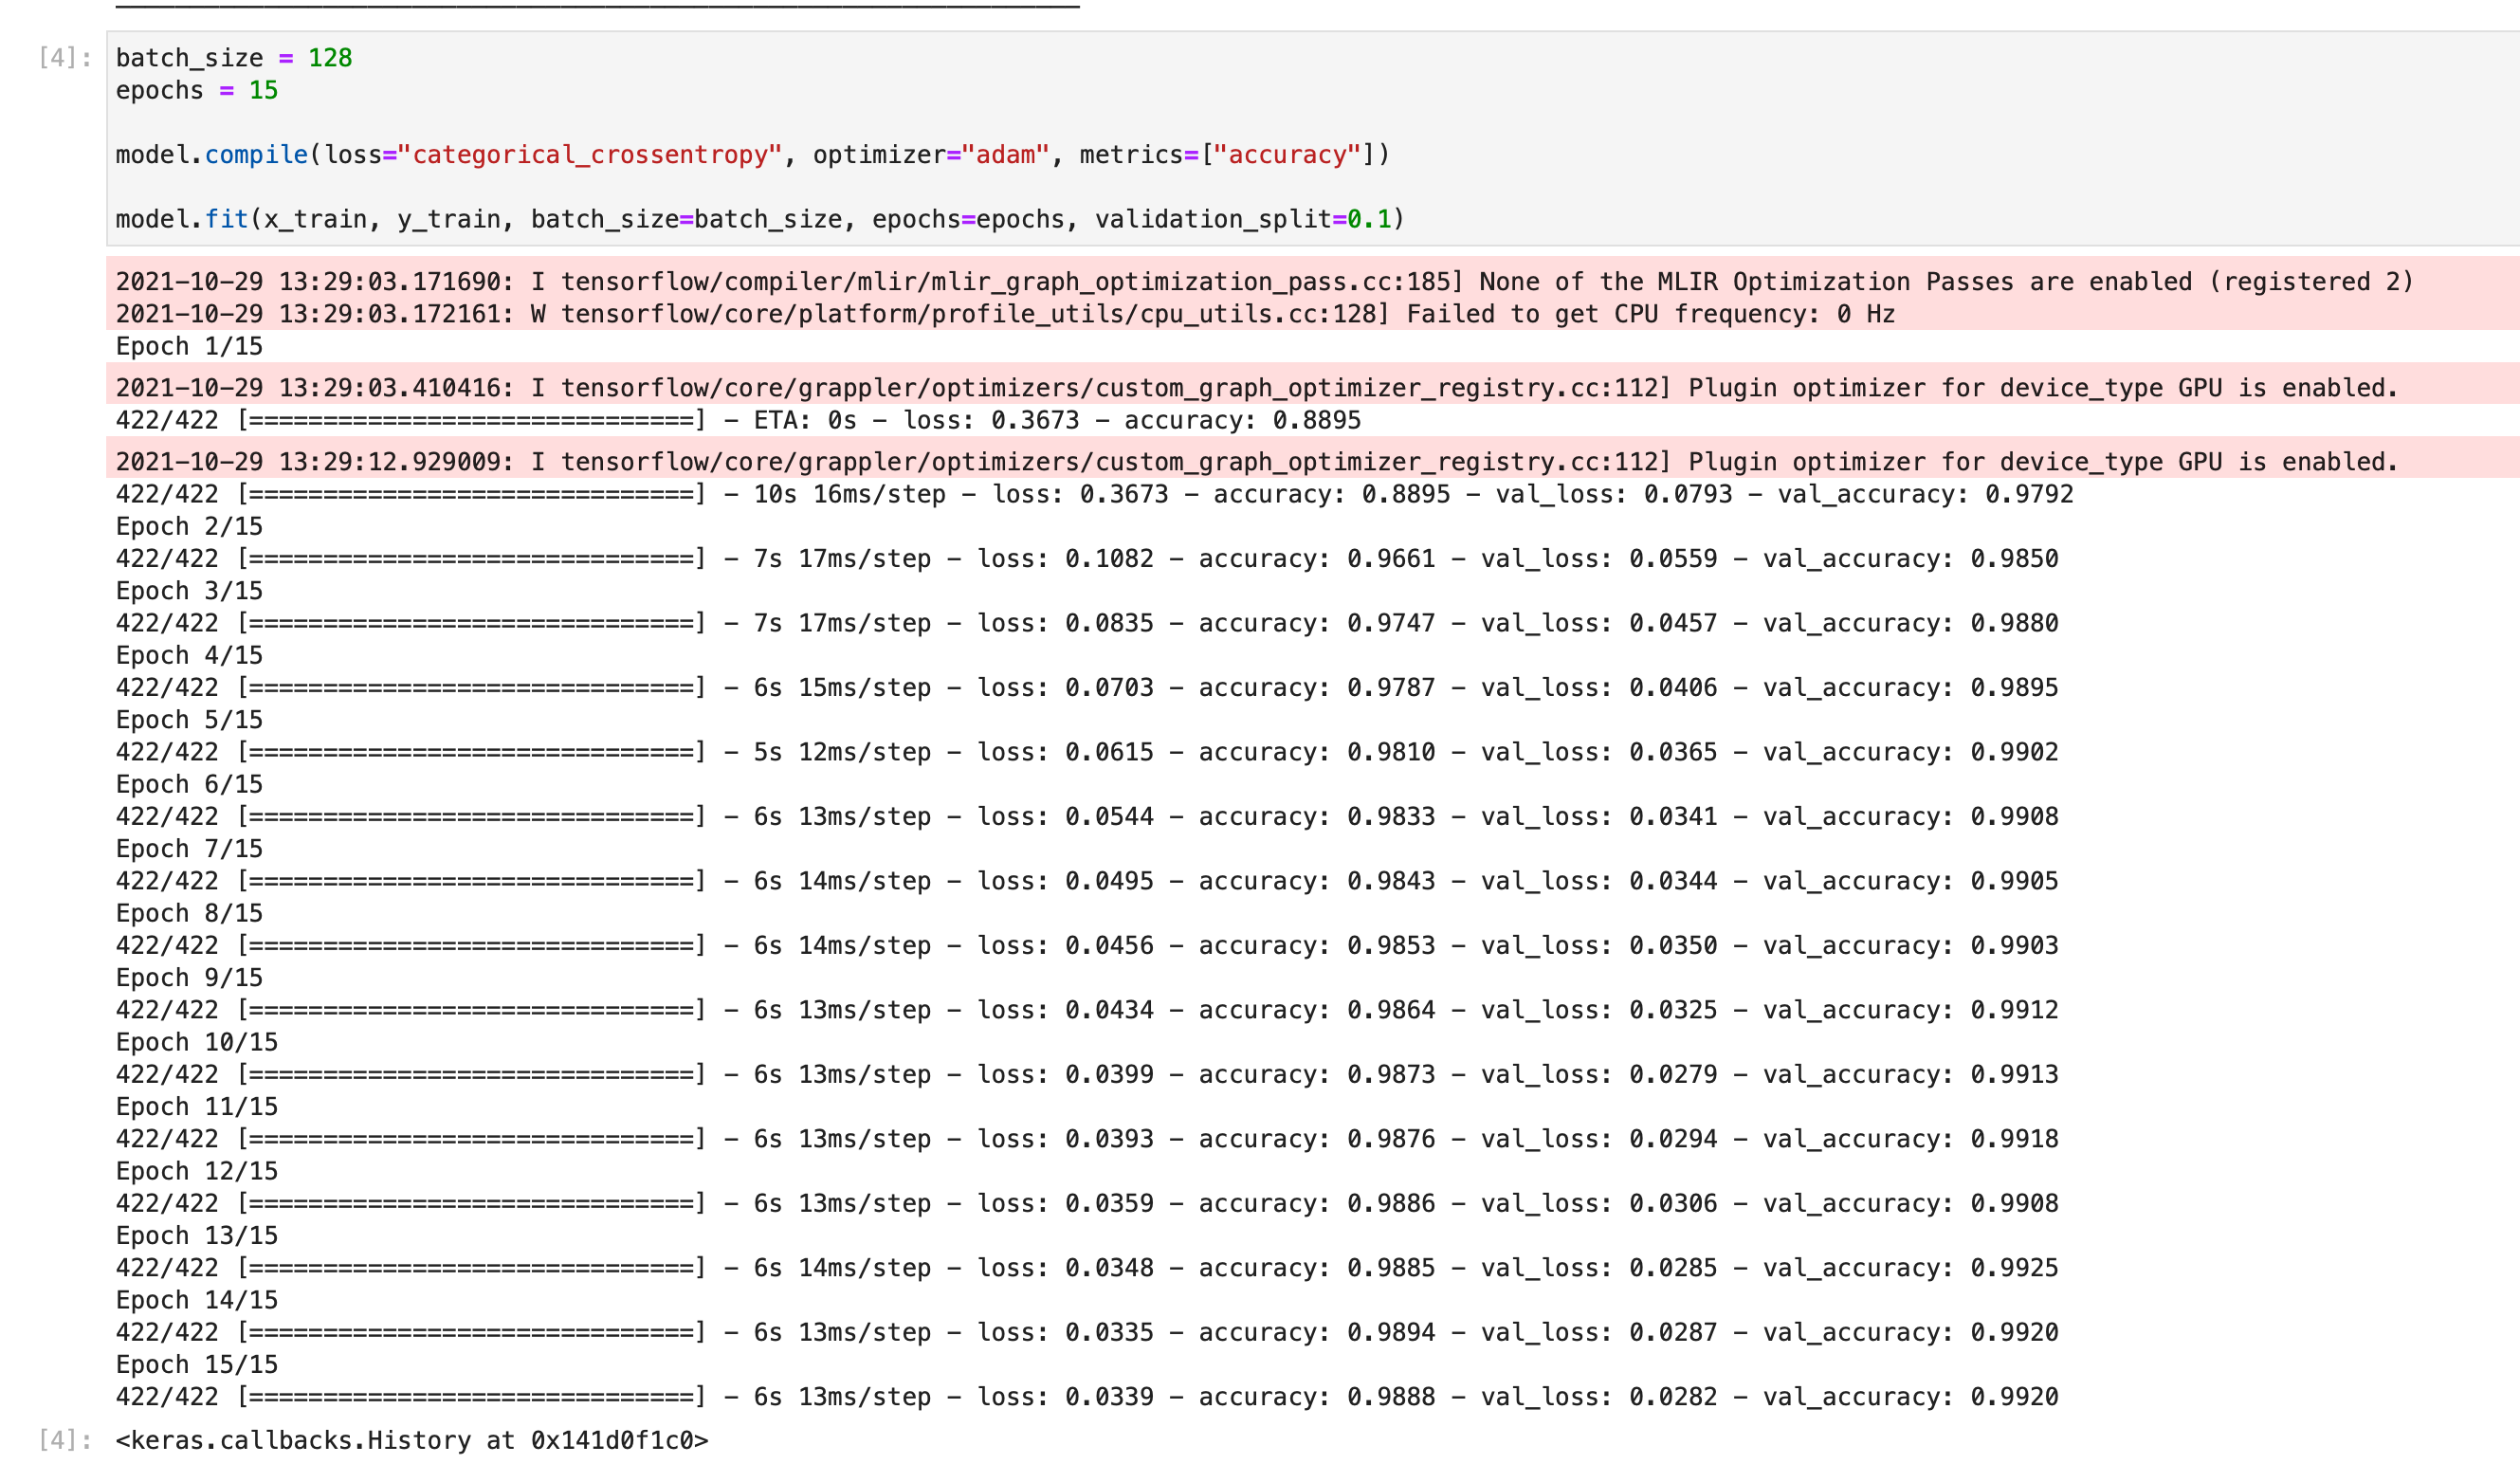
]]>Varokas PanusuwanUsing Tensorflow and Keras on M1 Macs2021-10-30T12:03:28+07:002021-10-30T12:03:28+07:00https://www.varokas.com/tensorflow-on-apple-silicon
First, we need to install miniforge. Easiest way to do that is to use pyenv. The tool allow us to install multiple version of pythons. More importantly, we can specify a version of python needed for each folder. Much more convinient than keep switching global versions
pyenv install miniforge3

mkdir demo-tensorflow-metal
pyenv local miniforge3
]]>Varokas PanusuwanLiving with M1 Mac2021-02-01T16:41:51+07:002021-02-01T16:41:51+07:00https://www.varokas.com/living-with-m1These are my current account of roadblocks and workaround in using the tools I frequent within Apple Silicon Mac. Mostly I'll try my best to make native works before falling back to using rosetta.
I'll keep this page updated as things improves. I'll note the PR waiting on the fix if applicable
Brew
(Brew Mostly works now)
Java
Many things in this category.
SDKMan – The gateway to Java installation. To install the Azul native M1 JDK, change the flag sdkman_rosetta2_compatbile=true in .sdkman/etc/config. The JDK will then Shows up
IntelliJ - Just Works!
Gradle - Works, but the output fallback to legacy mode. Fixed in 7.0 nightly
Java Packages with Native Extensions - E.g. Netty using NIO. They provides an Arm binary, but you'd need to grab the latest versions
Python
PyEnv - Works. Preferred way to install Python anyway. Python 3.9.1, which is the official version supporting Apple Silicon compiles and works. 3.8.6 does not work though.
Data Science Libs - NumPy, a foundation package of anything data science, would not install via Pip. A fix is in the unreleased Numpy 1.20. The workaround is to install MiniForce (Miniconda) which provides a precompiled version of the libs. Then we can use conda install numpy for now.
Keep in mind that while most popular projects provides an arm64 images, many doesn't. Docker will run the x64 images under qemu emulation and is much much slower. If you have a precompiled images you use and share with your team. You may need to build another one
It is possible to use buildx to cross build arm64 docker image from Intel machines. This is very useful for CI. I may do a separate blog for this.
]]>Varokas PanusuwanAWS Lambda Function from Docker Image2021-01-11T17:12:10+07:002021-01-11T17:12:10+07:00https://www.varokas.com/aws-lambda-dockerSince Dec 1, 2020, AWS Lambda allow developers to uses any docker images to be executed as lambda functions. This obviously bring tons of benefits and conveniences.
Simplified Dependencies Management. No longer needed to pack dependencies in zip file. This was especially annoying for Java and Python.
Better Local Testing . Since this is docker based. The code we run on our machine is exactly the same running in AWS. Say – If a role and permission is misconfigured, the function blows up locally rather than later in prod.
Greater Size Limit. Instead of 50MB zip file limit, Lambda allows for up to 10GB container image size. This is great news for Data Scientist around the world deploying their 500MB+ models.
We could use any correctly created custom images. It is far easier to based off Amazon provided images. We will end up with images that behaves very close to how AWS runs in production today when deploying zip file. (CloudWatch Logging and metrics exported and all).
First, Create the app code (app.py). This should looks exactly like a normal lambda function. We'd need a handler function which accepts an event and lambda context, returning function result.
Copy the function into our docker image. Run the function with <file_name>.<function_name> in CMD.
FROM public.ecr.aws/lambda/python:3.8

COPY app.py ./
CMD ["app.handler"]
Dockerfile
Build our image
$ docker build . -t lambda-docker-python
Running and Testing
These steps should be very familiar to anybody who has been using docker.
docker run -p 9000:8080 lambda-docker-python:latest
Now we could invoke our functions using curl. Per Lambda Runtime Interface Client library doc, the correct route to the deployed handler is /2015-03-31/functions/function/invocations . (Not sure why they impose this convention though – but you'll get 404 otherwise).
This means we could invoke our function by this curl
$ curl -XPOST "http://localhost:9000/2015-03-31/functions/function/invocations" -d '{}'
{"hello": "world"}

### If we look at docker run logs, we'd see a very familiar lambda logging -- this is great!
..
START RequestId: 826b34b9-498e-4468-9e4c-ffa7db08b050 Version: $LATEST
END RequestId: 826b34b9-498e-4468-9e4c-ffa7db08b050
REPORT RequestId: 826b34b9-498e-4468-9e4c-ffa7db08b050	Init Duration: 0.43 ms	Duration: 165.74 ms	Billed Duration: 200 ms	...
..
Adding Dependencies
In my opinion, this is the most compelling reason to use Docker image based lambda. We do not need to do dependencies packing gymnastics to make it work. We just define and download it like we would in local machine/our docker.
For python, that means creates a requirements.txt and invoke a pip install on the file.
requests==2.25.1
requirements.txt
FROM public.ecr.aws/lambda/python:3.8

COPY requirements.txt ./
RUN pip install -r requirements.txt

COPY app.py ./
CMD ["app.handler"]
modified Dockerfile
import requests

def handler(event, context):
  r = requests.get("https://api.covidtracking.com/v1/us/daily.json")
  j = r.json()

  return [ {"states": r["states"], "positive": r["positive"]} for r in j]
modified app.py
Create ECR Repository
Follow the manual steps or uses CDK. Optionally we may want to keep only last 10 images instead of indefinitely keeps all versions.
Note the created repository id, which would be in form of <account>.dkr.ecr.<region>.amazonaws.com/<repo_name>. We need it to login and upload
Upload Image to ECR
First, Logging into ECR requires AWS CLI to obtain password. We can then pipe into docker login. Per instruction here. Replace 820792572713 with your aws account number.
]]>Varokas PanusuwanAWS Lambda Functions in Scala2021-01-04T18:08:03+07:002021-01-04T18:08:03+07:00https://www.varokas.com/aws-lambda-functions-in-scalaInitialize Scala Project
Assuming we are familiar with SBT and have that installed
$ sbt new scala/scala-seed.g8

A minimal Scala project.

name [Scala Seed Project]: Lambda Scala Seed

Template applied in /Users/vpanusuwan/projects/./lambda-scala-seed
Add Lambda Library
The libraries contains event classes which is a typed input for lambda. Check latest version at mvnrepository for java-core and java-events separately.
Create a class with method of any name in any package. The important thing is that the method accepts a lambda event
package example

import com.amazonaws.services.lambda.runtime.Context
import com.amazonaws.services.lambda.runtime.events.{APIGatewayV2HTTPEvent, APIGatewayV2HTTPResponse}

class Main  {
  def handler(apiGatewayEvent: APIGatewayV2HTTPEvent, context: Context): APIGatewayV2HTTPResponse = {
    println(s"body = ${apiGatewayEvent.getBody()}")
    return APIGatewayV2HTTPResponse.builder()
      .withStatusCode(200)
      .withBody("okay")
      .build()
  }
}
Configure Assembly Plugin
Next is to configure the assembly plugin to produce a single fat jar containing our code and all the dependencies together. See latest version of the plugin at https://github.com/sbt/sbt-assembly
In build.sbt, configure the fat jar merging strategies. At very minimum we should discard contents in META-INF. Also overrides a jar name.
assemblyJarName in assembly := "lambda-scala-seed.jar"

assemblyMergeStrategy in assembly := {
  case PathList("META-INF", xs @ _*) => MergeStrategy.discard
  case x => MergeStrategy.first
}
Package
sbt assembly
Then finds the packaged jar at target/scala-2.13/<jarname>
First, Lambda needs a role to execute, which should at least have the AWSLambdaBasicExecutionRolepolicy attached. The policy simply enables a write to CloudWatch logs. A cdk snipplet to create such role would be.
 lambda_basic_policy = iam.ManagedPolicy.from_aws_managed_policy_name("service-role/AWSLambdaBasicExecutionRole")

role = iam.Role(self, "fn_lambda_role", role_name="fn_lambda_role", assumed_by=iam.ServicePrincipal("lambda.amazonaws.com"))
role.add_managed_policy(lambda_basic_policy)
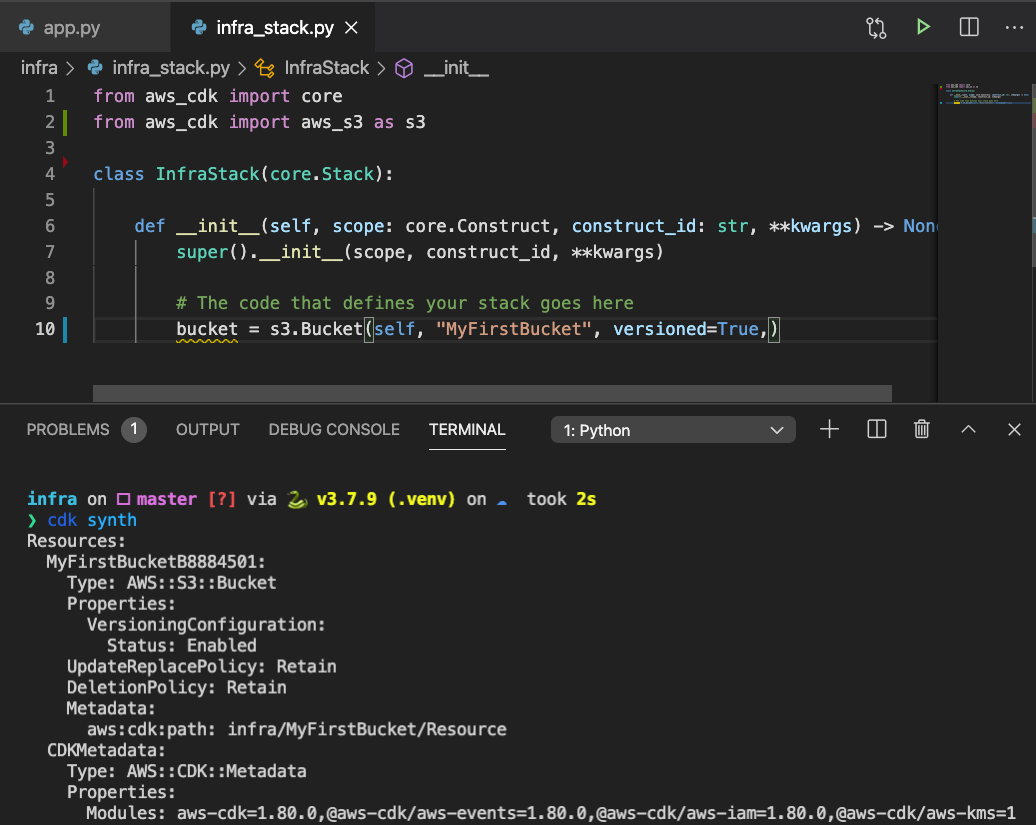
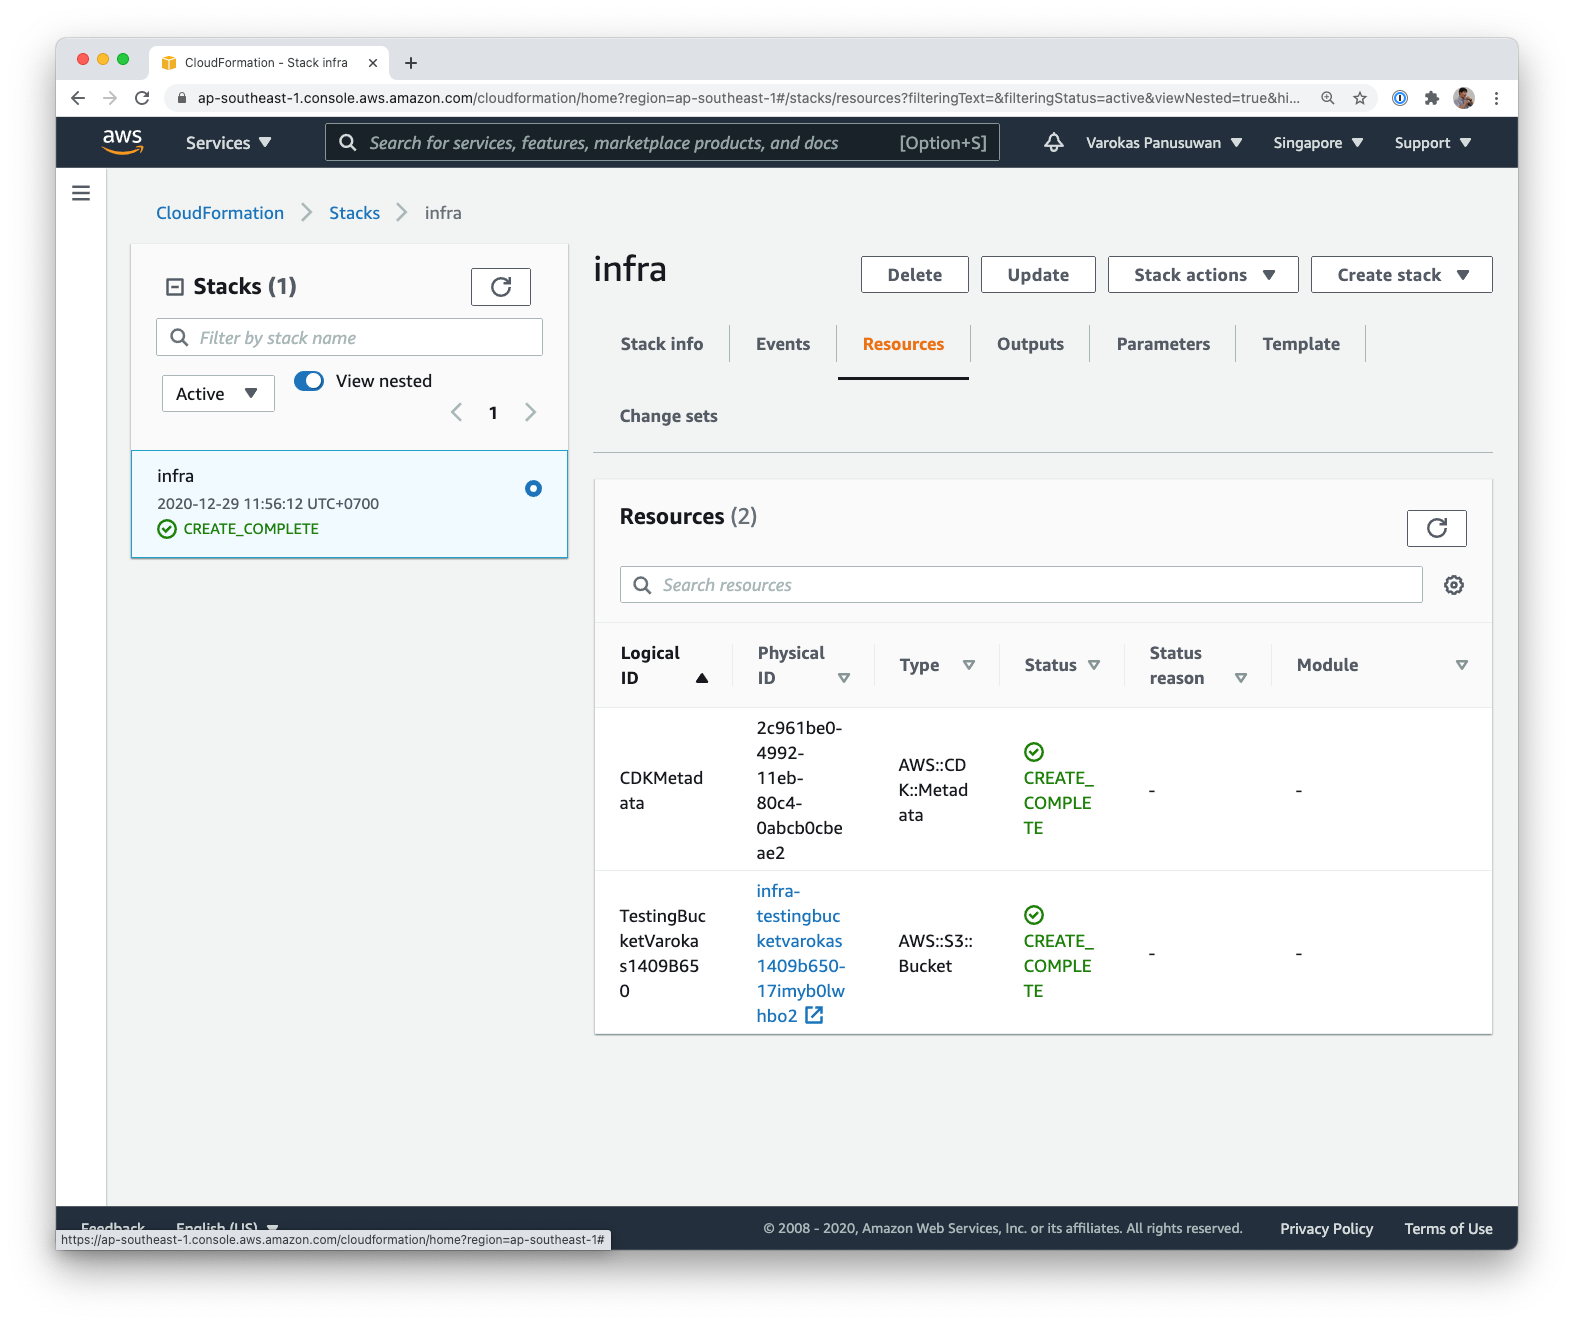
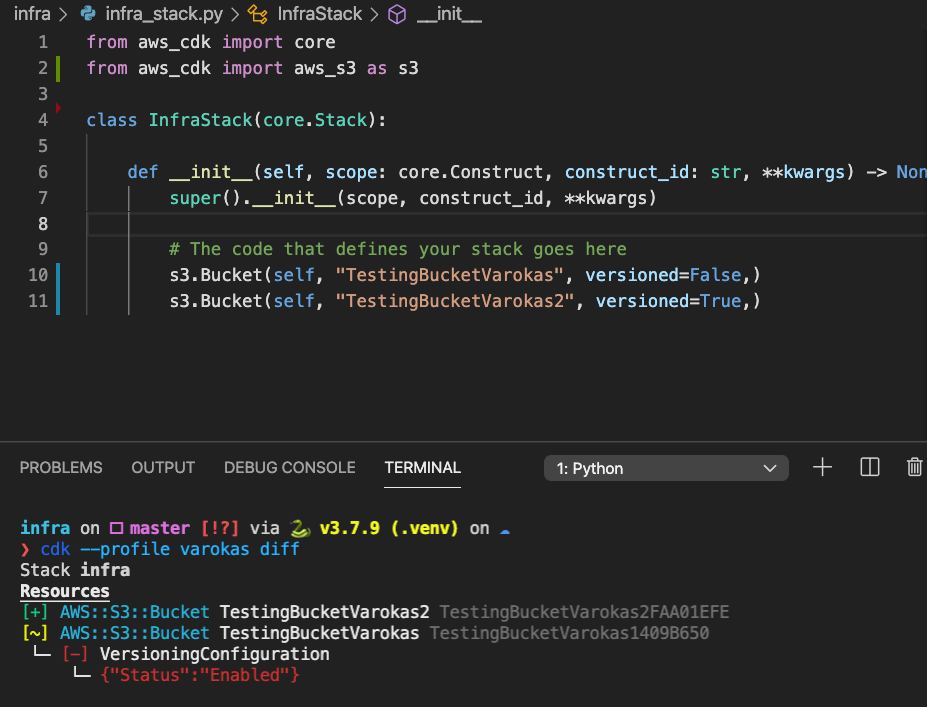
]]>Varokas PanusuwanDefine AWS Infrastructure in Python with AWS Cloud Development Kit2020-12-30T16:59:15+07:002020-12-30T16:59:15+07:00https://www.varokas.com/aws-cloud-development-kitWith AWS CDK, we can define an infrastructure using familiar languages (Python, JS, Java, etc) . The code will be compiled into a cloud formation JSON and deployed as a cloud formation stack. Later we can diff the changes made before redeploy.
These sorting algorithms divide the given list into 2 subproblems of roughly the same size. There are two prominent algorithms in this category.
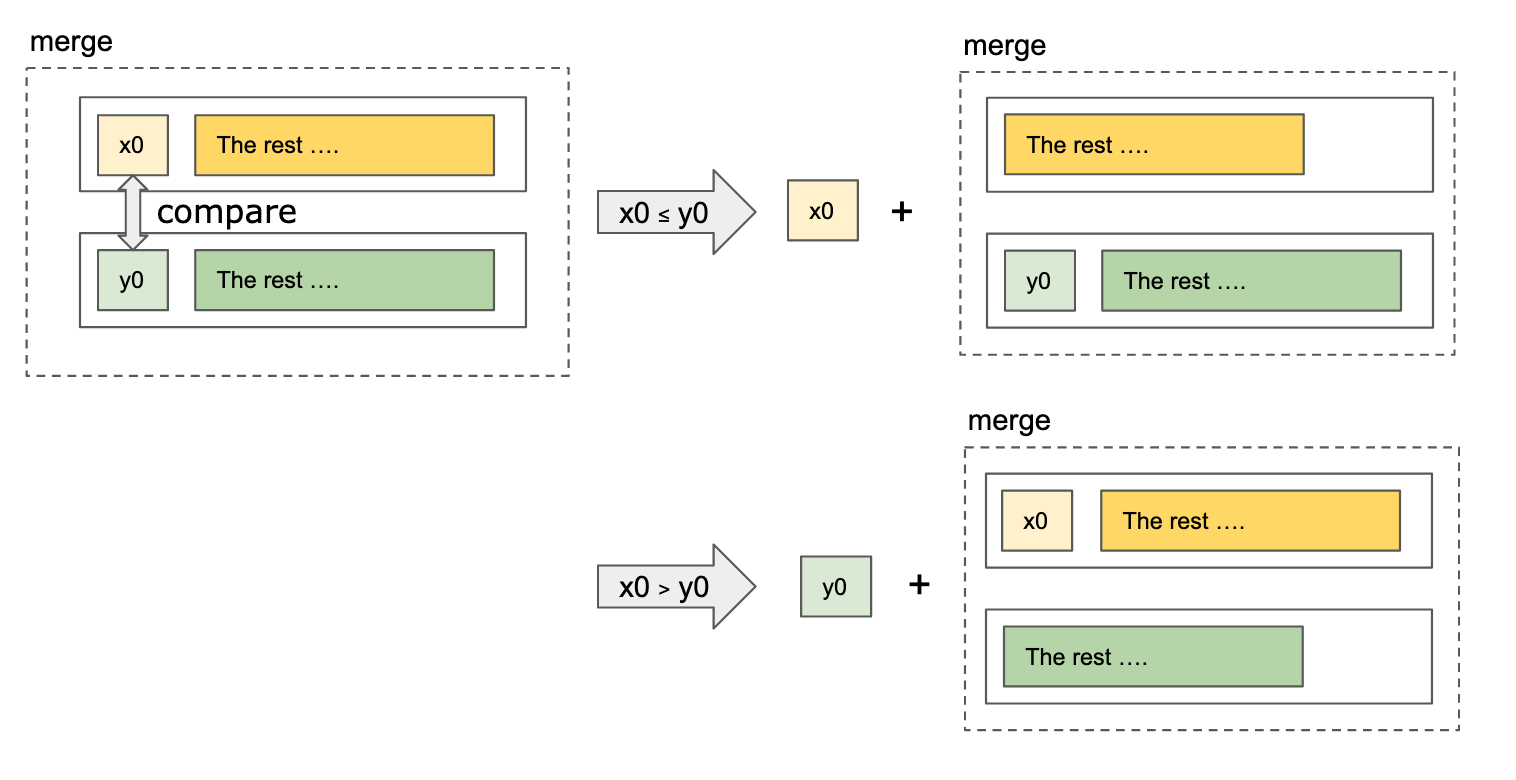
Merge sort - uses a linear time algorithm to combine the two sorted lists
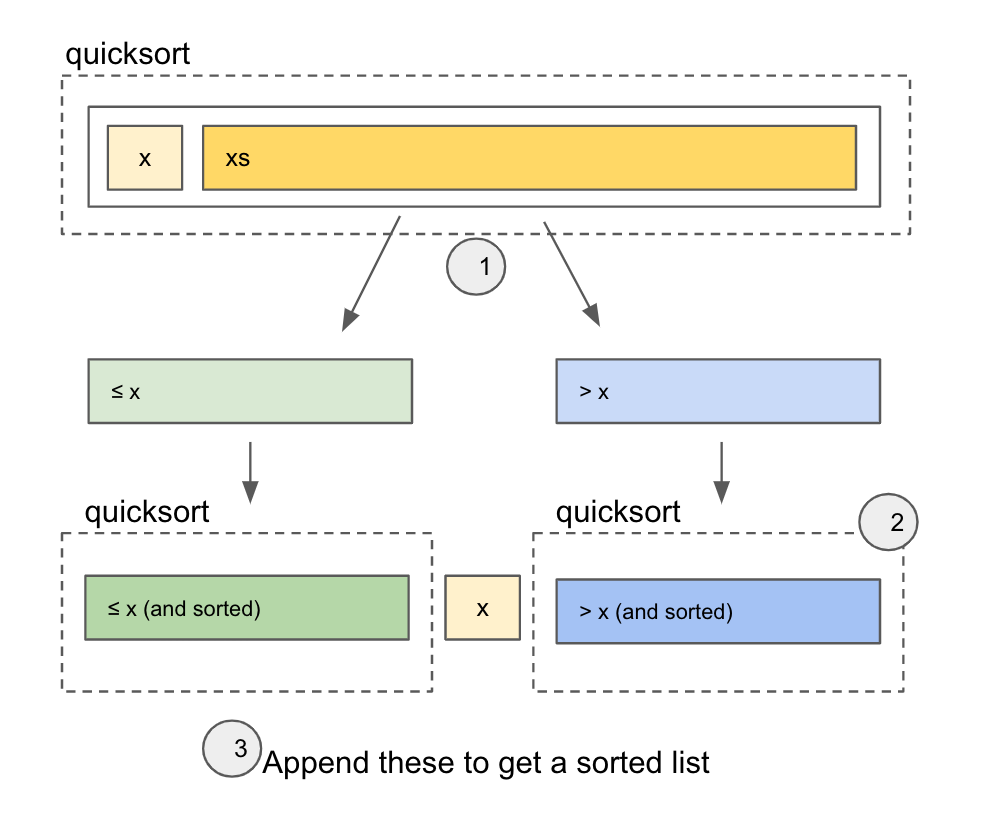
Quick sort - uses a linear time algorithm to partition values into left (less than) and right (more than) a pivot.
Merge Sort
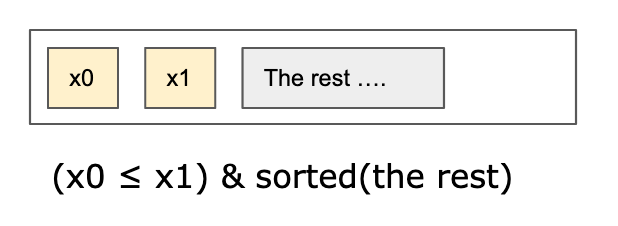
Given 2 already sorted lists, compare only the first element from both lists. The smaller value got appended to the result. Repeat this process with that smaller value removed from consideration.
merge :: Ord a => [a] -> [a] -> [a]
merge [] [] = []
merge xs [] = xs
merge [] ys = ys
merge (x:xs) (y:ys)
  | x <= y    = x : merge xs (y:ys)
  | otherwise = y : merge (x:xs) ys
The full merge sort algorithm simply halves a given unsorted list, recursive call to sort each half. Afterward, combining the two sorted halves with the merge algorithm defined above.
Here is a classic intro in showing the expressive power of Haskell.
Uses the first value x as a pivot point. Loop and separate values into ≤ xgroup and >x group.
Recursively calls quick sort into the two groups
join the ≤ x, x, and >x group together
There's no guarantee that the two groups are partitioned into equal sizes. There exists a way to do quick sort in-place without additional memory, however.
qSort :: Ord a => [a] -> [a]
qSort [] = []
qSort (x:xs) = qSort(left) ++ [x] ++ qSort(right)
  where
      left  = [y | y <- xs, y <= x]
      right = [y | y <- xs, y >  x]
Quadratic time sorting algorithms
Also known as O(n^2). These algorithms have a similar outline where the problem size is reduced by 1 per iteration of execution. Each iteration itself takes a linear time, making this O (n^2) in total.
Selection Sort
Finds a min value from a list, adds to answer, repeats on the remaining list excluding the selected min value.
sSort :: Ord a => [a] -> [a]
sSort [] = []
sSort xs = min : sSort(remaining)
  where min = minimum xs
        remaining = delete min xs
Insertion Sort
Maintain a sorted list (the answer), starting from empty. Insert a new value one element at a time from original lists at the right index in the sorted answer.
orderedInsert :: Ord a => a -> [a] -> [a]
orderedInsert a [] = [a]
orderedInsert a (x:xs)
  | a < x     = a:x:xs
  | otherwise = x:(orderedInsert a xs)

iSort :: Ord a => [a] -> [a]
iSort [] = []
iSort (x:xs) = orderedInsert x (iSort xs)
Bubble Sort
Closely related to selection sort. Instead of selecting a max value, bubbles the value as we compare each element.
]]>Varokas PanusuwanSecrets in Code with Mozilla SOPS2020-05-25T14:17:07+07:002020-05-25T14:17:07+07:00https://www.varokas.com/secrets-in-code-with-mozilla-sopsSecrets presents a challenging dilemma for infrasture-as-a-code. Solution today converge mostly on storing these secrets in some external trusted system (Kube Secrets, Docker Secrets, Build System Secrest, Vault) outside of the code.
Using SOPS, we can check in the encrypted secrets (e.g. connection passwords) along with the code. The only thing out of sight is the encryption key wrapping these passwords.
The added value also is that SOPS understand structured file (JSON,YAML) and encrypt only values, leaving the keys intact to easily inspect.
Example – This file could be checked into github along with the code.
Or – Alternately, put the file in any directory and set the Path environment variable accordingly
Encryption Key Configuration
The most important configuration for SOPS is what encryption key to use. In many case this is the only configuration needed.
Create a .sops.yaml at the root directory of the project with one of the configuration outlined below.
The key could be any PGP key. Alternately the key could also be provided by a Key Management Service (KMS) in AWS or Google Cloud. A good choice especially if the code eventually would be deployed to these cloud providers.
AWS KMS
A master key can be created in hardware security modules via AWS Key Management Service (KMS). We need arn of the key with a corresponding AWS Profile that has a permission to use the key.
$ aws --profile myprofile configure
AWS Access Key ID [None]: KEY_ID
AWS Secret Access Key [None]: SECRET_ACCESS_KEY

# Create .sops.yaml At project root
$ vi .sops.yaml
creation_rules:
  # If assuming roles for another account use "arn+role_arn".
  # See Advanced usage
  - kms: "arn:aws:kms:..."
    aws_profile: myprofile
For slightly more advanced use cases. We could also access master key from another account using AWS AssumeRole mechanism. This is particularly useful when we have one master key in production, but wanted to also access it from our staging AWS account. See https://github.com/mozilla/sops#assuming-roles-and-using-kms-in-various-aws-accounts
PGP (optionally via Keybase)
For personal use cases, using a PGP key probably suffice. If you are a keybase user, you already have a PGP key. We needed to do the followings
Install GPG
Export private keys from Keybase
Import the keys to local machine
(optional) Remove passphrase from the key
Create .sops.yaml at the project
$ brew install gpg ## or apt install gpg
$ gpg --import private_key.asc

... (take note of the key ID: 0701C740FB8D24E9)
...
gpg: key 0701C740FB8D24E9: secret key imported
...
...

# This is important for the passphrase screen to show up in console
$ export GPG_TTY=$(tty)
$ gpg --edit-key 0701C740FB8D24E9
gpg> passwd
# 1. Type current passphrase
# 2. Type "" (Blank)
# 3. Type "" (Confirm Blank)

$ vi .sops.yaml
creation_rules:
  - pgp: 0701C740FB8D24E9
Generate new GPG Key (And export)
Sometimes we want to generate and managed the GPG key without keybase
$ gpg --full-generate-key

Kind of key : (1) RSA and RSA (default)
keysize: 3072
Key is valid for? : 0 (Do not expire)

Real name: <name>
Email: <email>
Comment: (blank)

Change (N)ame, (C)omment, (E)mail or (O)kay/(Q)uit? o

Enter Passphrase 2 times (cannot be blank)

public and secret key created and signed.

pub   rsa3072 2020-11-26 [SC]
      3F73E4821B848420CDEAEAD585E2DE2374D6377A  ---> Note this value
uid                      test1 <test1@test2.com>
sub   rsa3072 2020-11-26 [E]

# Remove the passphrase if wanted
# This is important for the passphrase screen to show up in console
$ export GPG_TTY=$(tty)
$ gpg --edit-key 3F73E4821B848420CDEAEAD585E2DE2374D6377A
gpg> passwd
# 1. Type current passphrase
# 2. Type "" (Blank)
# 3. Type "" (Confirm Blank)
Using the keys, we could just pipe the decrypted result to ssh-add without writing to file first.
ssh-add - <<< $(sops -d private_key.sops)
Python Script
SOPS used to be written in python, but reimplemented in golang. The pip package exists but with many features missing. It is probably better to call it via subprocess.
import subprocess
b = subprocess.check_output(['sops', "-d", "private_key.sops"])
Kubernetes Secrets
Create a new yaml file, but indicates to SOPs that only data and stringData are keys to encrypt
]]>Varokas PanusuwanSelf Hosted Ghost Blog setup with Docker2020-04-20T07:29:16+07:002020-04-20T07:29:16+07:00https://www.varokas.com/self-hosted-ghost-dockerJust recently updated this blog itself to latest version of Ghost running via docker-compose. The blog itself is TLS enabled and backed up the content to S3 periodically. This is my public note on how. In case anybody would find it useful.
Ghost docker hub page is a great place to get started. I added to it to get what I needed. Namely a backup and TLS proxy.
The server
The example used here are based on Ubuntu 18.04. We also needed to install docker on the host. The steps are detailed in the excellent guide below.
Make sure to open firewall on port 80 and 443. Port 80 won't be doing much, just a redirect to 443.
The services
The docker-compose.yml file below has 3 services
ghost – This is the ghost server itself. Runing on port 2368. Mounted the content directory (mainly images) to the host /var/lib/ghost/content.
db – The mariadb server that ghost server writes to. Change MYSQL_ROOT_PASSWORD to match what ghost server expects
caddy - Our TLS proxy from outside world to our ghost server. This is a much easier route compared to fiddling with nginx and certbot. Make sure to put Caddyfile in /home/ubuntu/caddy/config/Caddyfile to configure the domain name and reverse proxy port correct.
Backup Script
The script tar-up a mounted content directory and calls to MySQL to dump a database. Then it proceeds to upload the result file to S3.
The script assumes there's an aws-cli installed with a profile called backup set up. On Ubuntu this could be as simple as.
$ sudo apt-get install awscli
$ aws configure --profile backup

AWS Access Key ID [None]: <keyname>
AWS Secret Access Key [None]: <secret>
Default region name [None]: <region>
Default output format [None]: yaml
Then put this script in /home/ubuntu/daily_backup.sh
Compared to previous method
The site used to be created via Digital Ocean Marketplace. Although simple and very easy to get started, I was stuck at the (rather old) version. Ghost is still very much in active development. Updating ghost sometimes means update version of NodeJS which may not be as simple when your base OS gets older.
 varokas