Creating Single secure Airflow instance on Ubuntu 18.04
Airflow installation beyond the basics are pretty involved. This is my notes on how. This note assumes the reader wanted to access airflow…


Airflow installation beyond the basics are pretty involved. This is my notes on how. This note assumes the reader wanted to access airflow from public web and …
- have a domain name to use
- Know how to create an ubuntu instance in the cloud (AWS, GCE, etc), with a sudo access
- Know how to config a firewall to that instance
Create a linux user for AirFlow
We will be creating a user airflow. We are going to install and set up services using this user. It is better to isolate this user from the user that we use to log in.
For Google Cloud Engine, this is simply to login with a new user
$ gcloud compute ssh airflow@airflowOr create it manually using this link : [How To Create a Sudo User on Ubuntu Quickstart | DigitalOcean]
From this point, it will be assumed that we are logged in with the user airflow
Install Airflow
First install pip3. Python3 is already installed with Ubuntu 18.04
$ sudo apt update
$ sudo apt install python3-pip
Now Install airflow
# To allow airflow to install
$ export AIRFLOW_GPL_UNIDECODE=yes

# Install the package itself
$ pip3 install apache-airflow
Restart the shell to make sure PATH is update for pip3 (or log off / log on ssh again). Otherwise, we cannot execute `airflow` from the bash.
After logged back in, run airflow once to create `~/airflow` directory
$ airflowCreate PostgresDB as backend database
Although airflow by default use sqlite, it will be restricted to only 1 task at a time. we should just go ahead and setup a proper database backend.
$ sudo apt install postgresqlThen create the database, a user and their password. psql only works with the user postgres, so we need to sudo as that user
$ sudo -u postgres psql -c "create database airflow"
$ sudo -u postgres psql -c "create user airflow with encrypted password 'mypass'";
$ sudo -u postgres psql -c "grant all privileges on database airflow to airflow";
After that install a package in airflow to support postgresql
$ pip3 install apache-airflow[postgres]
$ pip3 install psycopg2
Change airflow config to connect to the newly created database.
### vi ~/airflow/airflow.cfg ###

sql_alchemy_conn = postgresql+psycopg2://airflow:mypass@localhost/airflow
Run command to initialize database
$ airflow initdbTest Run
At this point we should test run that airflow works. Make sure port 8080 is open
$ airflow web server -p 8080In order to start running a job, a schedule needs to also run in foreground. Logs in with another session of ssh then execute
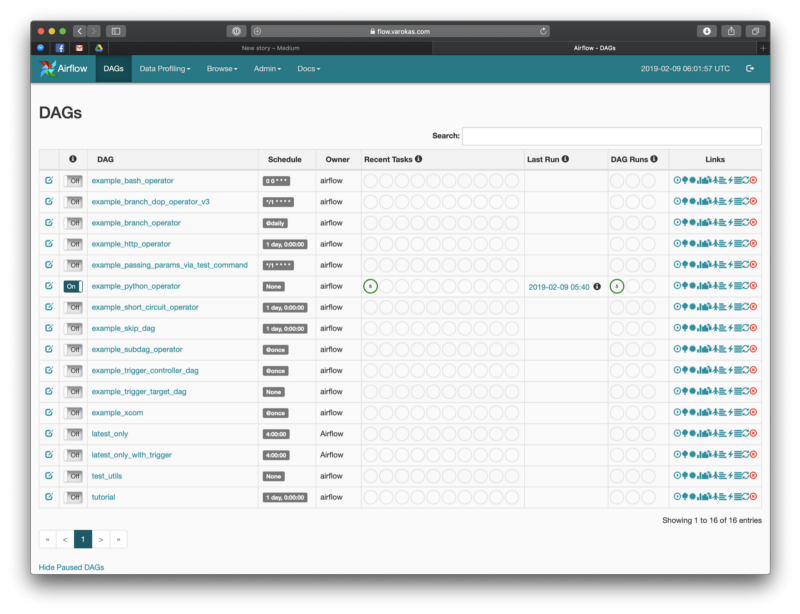
$ airflow schedulerTo test run a job. Go to http://<yoursite>:8080. Dont forget to turn “ON” the DAG before clicking run.
Create Service with Systemd
So that airflow runs in background and starts up automatically with the server.
- https://github.com/apache/airflow/tree/master/scripts/systemd)
- https://www.linode.com/docs/quick-answers/linux-essentials/what-is-systemd/
First copy the default systemd service script from airflow github
$ sudo curl -o /etc/systemd/system/airflow-webserver.service https://raw.githubusercontent.com/apache/airflow/master/scripts/systemd/airflow-webserver.service

$ sudo curl -o /etc/systemd/system/airflow-scheduler.service https://raw.githubusercontent.com/apache/airflow/master/scripts/systemd/airflow-scheduler.service
The default script was meant to be run in CentOS/Redhat. So we need to adjust some parameters.
#############################################################
### sudo vi /etc/systemd/system/airflow-webserver.service ###
#############################################################

# EnvironmentFile=/etc/sysconfig/airflow (comment out this line)
Environment="PATH=/home/airflow/.local/bin:/usr/local/sbin:/usr/local/bin:/usr/sbin:/usr/bin:/sbin:/bin"
ExecStart=/home/airflow/.local/bin/airflow webserver — pid /home/airflow/airflow-webserver.pid

#############################################################
### sudo vi /etc/systemd/system/airflow-scheduler.service ###
#############################################################

# EnvironmentFile=/etc/sysconfig/airflow (comment out this line)
Environment="PATH=/home/airflow/.local/bin:/usr/local/sbin:/usr/local/bin:/usr/sbin:/usr/bin:/sbin:/bin"

ExecStart=/home/airflow/.local/bin/airflow scheduler
After the services files are edited, reload it to systemd daemon
$ sudo systemctl daemon-reloadThen start the servers
$ sudo systemctl start airflow-webserver
$ sudo systemctl start airflow-scheduler
We can check the status of each service using command
$ sudo systemctl status airflow-webserver
$ sudo systemctl status airflow-scheduler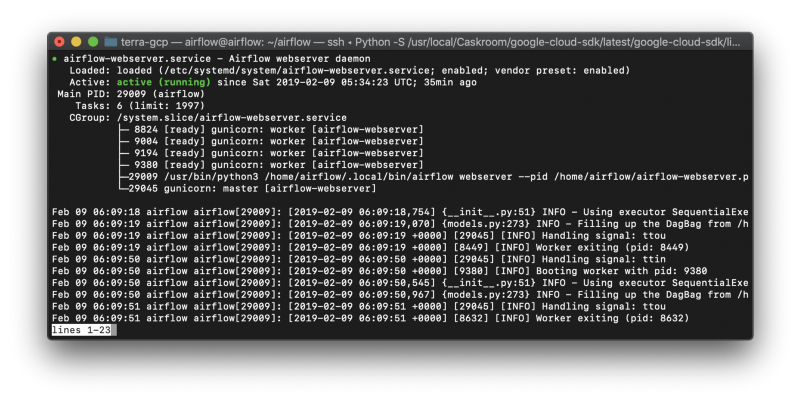
If all is well, enable these two services to start at boot
$ sudo systemctl enable airflow-webserver
$ sudo systemctl enable airflow-scheduler
Secure with Nginx and SSL
Although airflow can do SSL by itself, it is probably better to use it via nginx proxy so that the certs are taken care of automatically by letsencrypt.
This is just a shorthand note of https://www.digitalocean.com/community/tutorials/how-to-secure-nginx-with-let-s-encrypt-on-ubuntu-18-04
First Install and enable nginx. Make sure port 80 is enabled.
$ sudo apt install nginx

# Verify that nginx works by going to http://<yoursite>

$ sudo systemctl enable nginx
Create Nginx config to proxy from port 80 ->8080.
### sudo vi /etc/nginx/sites-available/airflow ###

server {
    listen 80;
    server_name <your server name>;

location / {
        proxy_pass http://localhost:8080;
        proxy_set_header Host $host;
        proxy_redirect off;
        proxy_http_version 1.1;
        proxy_set_header Upgrade $http_upgrade;
        proxy_set_header Connection "upgrade";
    }
}
Then create replace the default config with this one
$ sudo rm /etc/nginx/sites-enabled/default
$ sudo ln -s /etc/nginx/sites-available/airflow /etc/nginx/sites-enabled/airflow

# Run to check that nginx configs are correct
$ sudo nginx -t

# Reload the config, no need for restart
$ sudo systemctl reload nginx
After that modify airflow config to enable proxy
### vi ~/airflow/airflow.cfg ###

enable_proxy_fix = True

###

# Restart airflow webserver
$ sudo systemctl restart airflow-webserver
Verify by going to http://<yoursite> (without the port 8080). It should be proxied correctly.
At this point we can drop 8080 from firewall.
SSL with Certbot
Make sure port 443 (https) is open
$ sudo add-apt-repository ppa:certbot/certbot
$ sudo apt install python-certbot-nginx

$ sudo certbot --nginx -d www.yourwebsite.com

Answer some prompts
(When asked to choose whether to redirect, say yes (2)
Please choose whether or not to redirect HTTP traffic to HTTPS, removing HTTP access.)
Verify by going to http://<yoursite> (without the port 8080). It should get redirected to https://<yoursite> and the website should be displayed correctly.
Protect with simple password auth
Airflow has a few security connectors. The simplest one asked us to add username/password via command line
Install flash-bcrypt (The manual does not mentioned this)
$ pip3 install flask-bcryptThen edit config file
### vi ~/airflow/airflow.cfg ###

[webserver]
authenticate = True
auth_backend = airflow.contrib.auth.backends.password_auth

####

$ sudo systemctl restart airflow-webserver
Create an airflow user from command line
/# navigate to the airflow installation directory/
$ cd ~/airflow
$ python3

import airflow
from airflow import models, settings
from airflow.contrib.auth.backends.password_auth import PasswordUser
user = PasswordUser(models.User())
user.username = 'new_user_name'
user.email = '[email protected]'
user.password = 'set_the_password'
session = settings.Session()
session.add(user)
session.commit()
session.close()
exit()